Solana Transactions with Better Call Sol

Transcript
Intro
Hey, this is Sohrab, head of engineering for Lab Eleven.
Today, I want to go through the basics of Solana transactions and I will be using Better Call Sol as a visual aid.
You can find me on Twitter by clicking this little laptop icon at the bottom of bettercallsol.dev.
This is going to be at the beginner level so treat it as a starting point, not a comprehensive guide. I will leave some references in the video description if you like to explore things further.
Let’s get started.
Overview
To perform any action on-chain, you need to submit a transaction to a Solana cluster.
A cluster is basically any group of Solana validators that share the same genesis block.
There are 3 major clusters in the Solana ecosystem:
Mainnet or Mainnet-beta, to be more precise, is “the real” cluster, where money is real.
Then there is Testnet, primarily used by the validators to try out new versions and test things out
And finally, there is Devnet, which is for developers to test out their Solana programs and Dapps.
As a beginner, Devnet is where we will be spending most of our time.
When a validator is elected as leader, it looks at the pending transactions and picks a subset to execute.
But we don't submit transactions directly to the validators. Instead, we submit them to RPC servers, and those servers forward them to the validators.
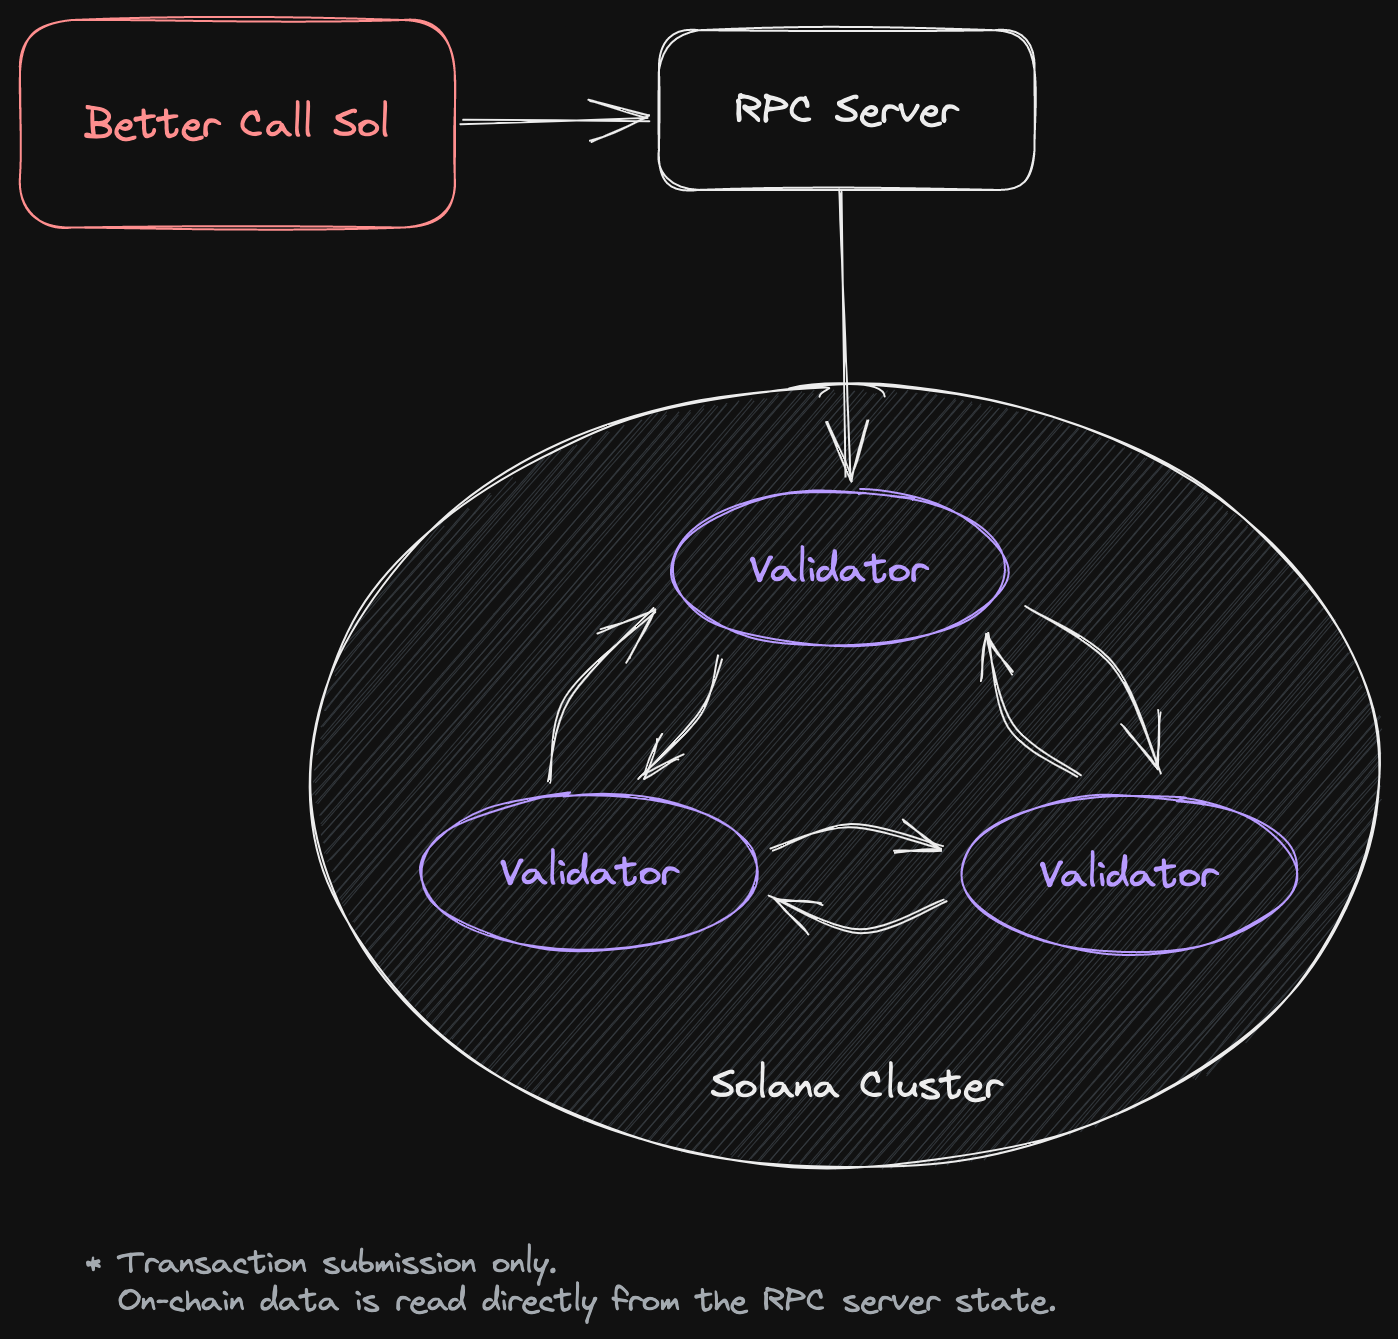
These URLs that use to communicate with Solana, are actually these RPC endpoints.
Better Call Sol is already populated with the public RPC endpoints that Solana Labs maintains. These endpoints are good for basic testing but once you build a Dapp, you would want to sign up for a third-party RPC provider that gives you some reliability and performance guarantees. You can add those custom RPC endpoints in the settings.
By the way, RPC (or Remote Procedure Call) is a protocol for running commands on a remote server. In this case, the command is communicated over HTTPS in a JSON format. You can see examples of these if you got to the RPC JSON API specs in the Solana docs.
As you can see, transactions are encoded as a base58 or preferably as a base64 string and sent to the RPC endpoint.
A transaction, itself, is made up of one or more instructions. In Better Call Sol, each instruction is indicated with a purple box.
An instruction essentially tells a validator to invoke an on-chain program.
The instruction is made up of 3 parts:
The address of the program that is being invoked
The other Solana accounts that are read or written to
And finally, the instruction data or the parameters to be provided to the program
Both the program and the accounts are specified using their public key. Each account on Solana is associated with an Ed25519 keypair.
The public key of the keypair is used as the address and the private key is kept... well... private and is used for signing transactions.
When we supply accounts to an instruction, we need to indicate whether they will be used as read-only or if we are planning to write to them.
Declaring these upfront helps Solana to schedule the transactions. For example, if multiple transactions only read an account, then those transactions can be executed in parallel. But if an account is written by multiple transactions, then each transaction has to be processed sequentially, where it would lock the account, write to it and release the lock for the next transaction.
Accounts can also be signers. This is handy when we need to give permission to a transaction to update an account and we need to prove we have authority over that account. We prove this by signing the transaction with the private key for that account, which proves we own the keypair for that account.
When it comes to instruction data, under the hood, we are providing a byte array to the program. As long as both we, the client, and the on-chain program have agreed on what this byte array represents, we can use it to provide additional arguments to the instruction.
For example, if the program expects a UTF-8 encoded string to come through, then we just need to make sure that's what we are sending it.
Raw binary data is good but for more complex interactions, the programs tend to define a schema for how they expect the instruction data to be laid out.
Two of the most popular ways of defining these schemas or layouts include:
Buffer layout, which you will find in various SPL programs, and
Borsh, which is prevalent in Anchor programs
Btw SPL stands for Solana Program Library and is basically a set of programs, developed by Solana Labs, to streamline some standard operations like creating tokens, token swaps, etc. Think of SPL programs as the standard lib of Solana.
The agreed-upon layouts normally consist of one or more fields of predefined types. During the encoding of a transaction, the value of each field is encoded into bytes and laid out one after another to make up the instruction data.
Setup
Now Let's look at executing some transactions and see what happens.
To send a transaction, we need to pay a transaction fee. This fee is paid to the validator to reimburse them for executing the transaction.
We pay the fee in SOLs, the native currency of Solana, and we do so from our wallet. A wallet is just yet another Solana account that we have the keypair for.
We sign transactions with our wallet keypair to give the validator permission to deduct the transaction fee from our SOL balance in that account.
We can generate a wallet using the Solana CLI but in this case, since we're in the browser, we will be using a wallet browser extension.
Here you can see a few popular Solana wallets. I will be using the Phantom wallet for this example.
By the way, please always make sure to use a throw-away wallet when you are dealing with a Dapp that you have never used or may not trust. It’s always better to be safe.
Since we are going to be mostly working in Devnet, we need to also switch the wallet to Devnet.
And since it is going to be paying for transactions we need to fund the wallet with some SOLs.
Here is a little trick: copy the wallet public key into a random account field in Better Call SOL. As long as you are in Devnet or Testnet, the tool gives you the opportunity to airdrop some SOLs into that wallet.
It costs very little to send a transaction so 1 SOL should be plenty.
Please note that Solana has placed some restrictions on the number of SOLs you can airdrop so don't go overboard with it.
The airdrop itself is actually a Solana transaction as well. Which you can view in a Solana explorer.
Solana explorers are platforms that parse on-chain transactions and give you a human-readable view of what happened on-chain. Here you can see that 1 SOL was transferred to our wallet.
Once the transaction is confirmed by the chain, you should see that your wallet balance has been updated with 1 SOL.
Memo Transaction: Simulate
We're finally ready to run a transaction. Let's start with the most basic transaction that you can run on the chain: a memo
When you load an example into Better Call Sol, it will come with some annotations to help you understand the transaction better. But that's what I'm here for so let's collapse those for more screen real estate.
Memo program is an SPL program that essentially lets you attach a memo to a transaction, by logging whatever you provide to it as instruction data.
As you can see, the program address is populated for us. This instruction takes no accounts since it does not need to read or write to any Solana accounts. And the program expects the instruction data to be provided as a UTF-8 string.
Now we can send this transaction to the chain and see what happens. But at times, especially in mainnet, you want to first simulate the transaction.
Given the deterministic nature of Solana transactions, you can ask an RPC server to simulate what happens if we run the transaction. The simulation is usually pretty close to the real thing, down to the program logs that may be generated.
This does not cost any transaction fees so it is a risk-free way of ensuring the transaction will work before sending it through. It also helps reduce the traffic in the cluster as fewer buggy transactions will make it through.
Let's try simulating this transaction first.
So it looks like this transaction will likely be successful and here are the log entries that the program will produce if the transaction is run.
The memo program essentially just logs any instruction data that we send it so you can see that would happen here.
The simulation also identifies which slot was used for the simulation. A slot is the period of time that a given validator is the leader and going to produce a block. It only lasts a few seconds and then the next slot starts with a new leader.
You can also see how many CUs or Compute Units will be consumed by running this transaction. Each transaction is budgeted for 200,000 compute units. This can be increased by paying more transaction fees. But for our purposes, the default is enough.
One interesting point is that printing a single line of program logs has consumed about 3% of the compute budget. Logging is quite expensive on Solana so please keep that in mind when you start creating your own on-chain programs.
Memo Transaction: Send
I think we are ready to send this transaction for real. So let's do that.
Before the transaction is sent, your wallet extension prompts you to "approve" the transaction. This essentially signs the transaction with your wallet keypair, authorising the validator to deduct the transaction fees. You can see this described as "network fees" in this wallet.
Once you approve the transaction, it is sent to the chain. And then Better Call Sol starts to poll the chain to monitor whether the transaction is being confirmed or not.
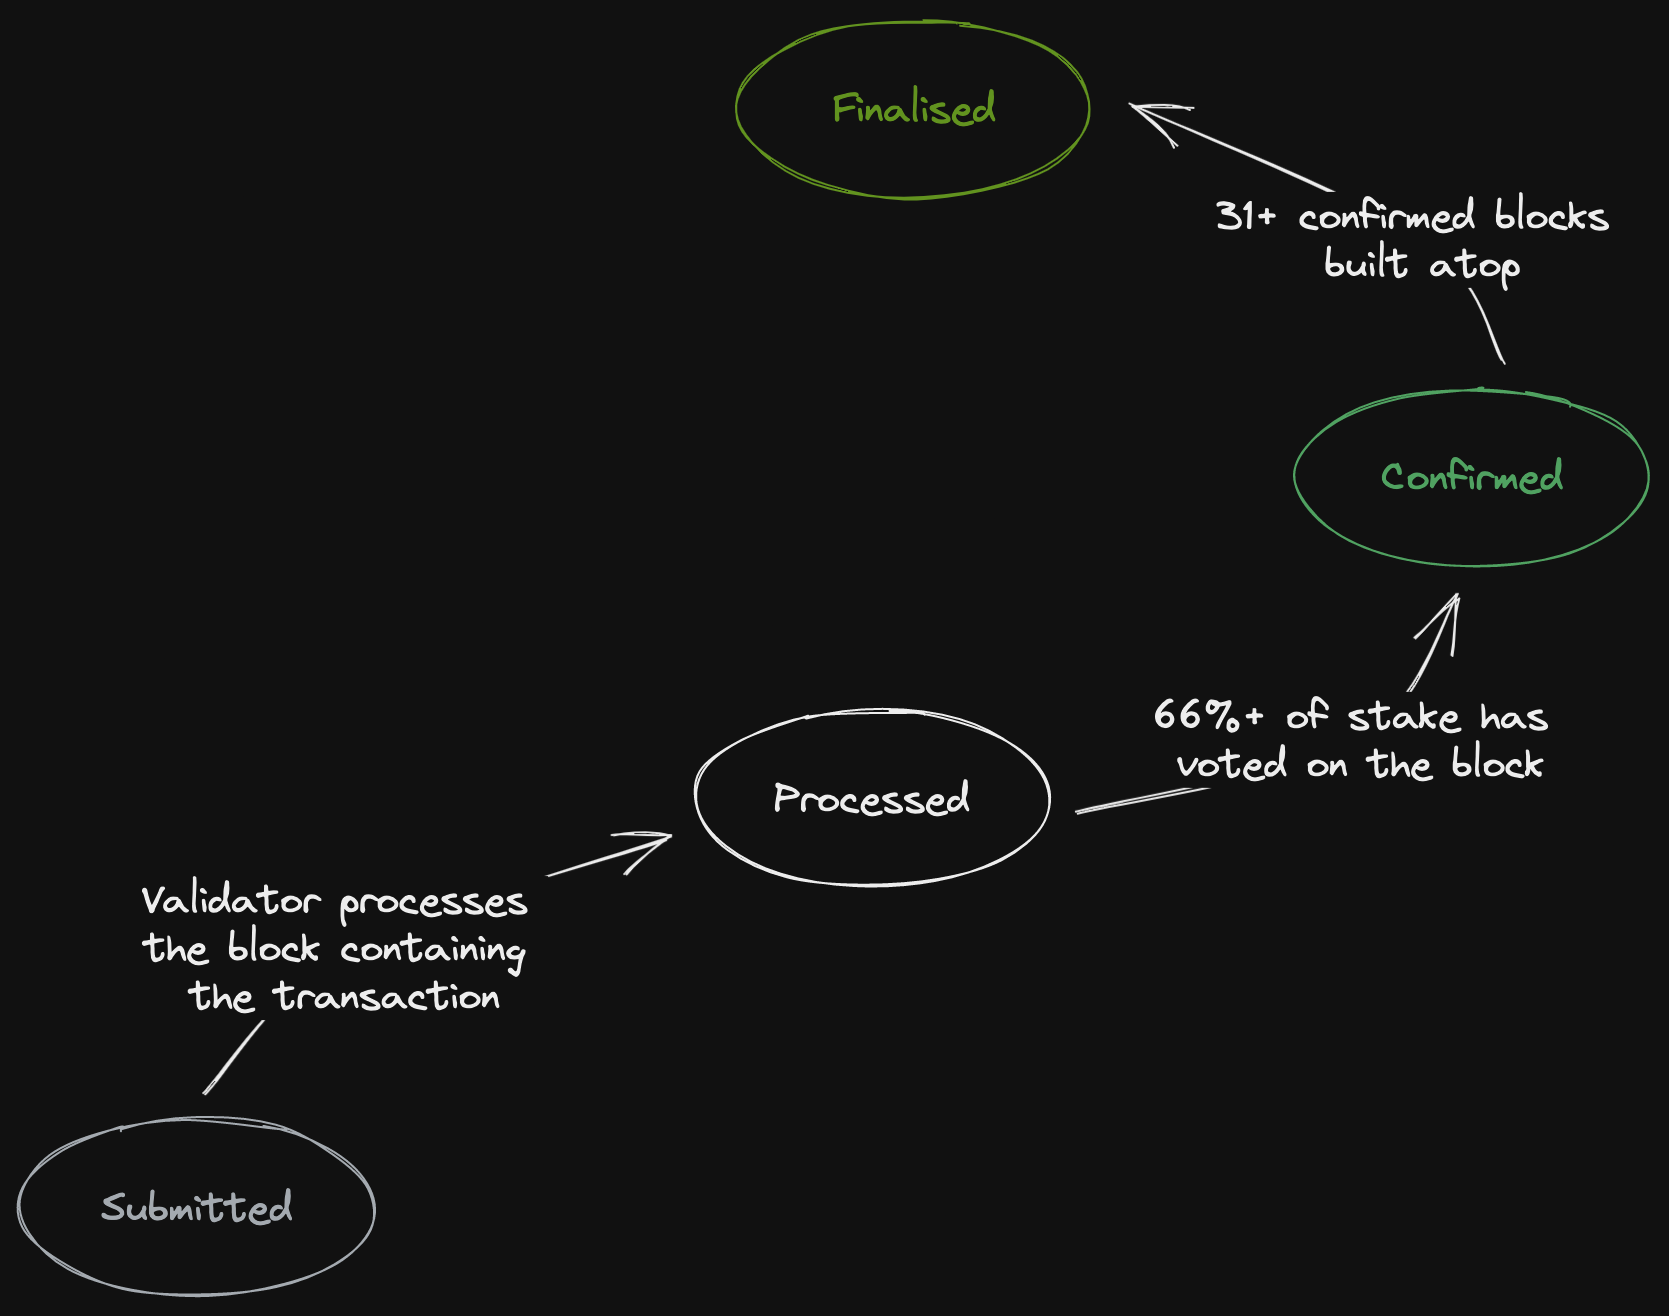
A transaction goes through a few different states till it is finalised. First, it is submitted to the RPC provider, who in turn submits it to the cluster. Then a validator picks up the transaction and processes it. It broadcasts the block, that contains our transactions (amongst others) to all other validators so they can confirm it. Once a majority of the validators have confirmed the block, the transaction is considered confirmed. There is one final commitment where enough other blocks are built on top of our block, which makes it impossible for a fork to discard our transaction. In other words, the transaction is finalised at that point.
When we submit a transaction to the cluster, we generate a transaction signature. This signature is a unique identifier for the transaction, which we can use to look it up after the fact.
Transaction signatures are also Ed25519 signatures that encode the transaction payload including the instructions. That is kinda handy because if you, by accident, double-submit the same transaction, the cluster can easily dedup that for you.
Another way that we prevent double-spending is by providing a recent blockhash when we send the transaction. We query the chain for a recently finalised block and include its identifier or hash in the transaction header.

If for any reason, the transaction doesn’t get picked up by the validator till much later, the validator checks how old this blockhash is. If too many blocks have been produced since when we submitted the transaction, then the transaction is too old and the validator will simply discard it.
This means that we can confidently re-submit the same transaction after the blockhash expires, knowing that if the old transaction was stuck somewhere and gets picked up by a validator, it won’t be processed.
Transfer SOLs Transaction
This was a relatively simple transaction. Let’s try something slightly more complex.
This time, we send a transaction that again consists of a single instruction. It will transfer some SOLs from one account to another.
For this, we need to use the system program. The system program is a native program to Solana blockchain, whose address you can see in the program field.
A transfer instruction takes two accounts: 1) the sender of funds, and 2) the receiver of funds.
Btw these account labels are provided for readability in Better Call Sol. They are not sent as part of the transaction. Solana distinguishes between accounts, purely based on the order they have been defined.
Both accounts are marked as writable since the balance of both accounts will change as a result of this instruction. The amount to be transferred will be deducted from the first one and added to the balance of the second one.
The first account has to sign the transaction to indicate that it agrees for the funds to be removed from its balance.
On Solana, there is no consent when receiving funds and tokens so the second account does NOT have to sign this transaction.
We will use our connected wallet as the sender of funds. Better Call Sol already knows this so you can just ask it to auto-fill the public key of your wallet in the first account field.
Remember that you can airdrop more SOLs using the airdrop button if you need to. Here, I don’t need to.
The second account is an arbitrary account I have created for this example.
Moving down to the instruction data, we can see that a buffer layout structure is expected.
System Program has 13 or so different operations implemented within a single program. So we need to identify which of those operations we intend to invoke.
The third operation, or index 2 in the 0-indexed list, is the transfer operation that we are after. So this is set for the first field in the instruction data.
We also need to provide the amount of funds we like to transfer. The amount is described in lamports and stored in a 64-bit unsigned integer. A billion lamports are equal to 1 SOL. Here we have decided to transfer 100,000 lamports across.
Ok, we are now ready to send this transaction.
This time the wallet indicates that some fund transfer is about to take place, besides the usual network fees.
Once we sign the transaction by approving it in our wallet, it is sent to the cluster and we wait for the results.
System program is invoked a lot as part of transactions so they tend not to log much so as not to consume transaction budgets.
But you can switch to looking at the account balances to see what exactly happened.
Here both the transaction fee and 100,000 lamports were deducted from the first account and 100,000 lamports were added to the second account’s balance.
You should be able to see this by opening each account in the Solana explorer as well.
Create Account Transaction
Now let’s step things up by doing another type of transaction. This time, we like to create a Solana account on-chain.
Create Account is yet another operation in the System program so we have filled in the system program public key. Also, it is the first operation so you will note the index 0 in the first instruction data field.
When an account is created on-chain, we pay rent for that account. The rent is the fee we pay validators for keeping the account and its content around.
At the start of each epoch, the rent due is deducted from account balances. This rent is calculated based on the size of the account.
The convention is to deposit 2 years' worth of rent in an account. Once we do that, the account becomes rent-exempt. In other words, the validators no longer will charge rent on that account.
So in this instruction, we need to indicate the account that will be paying the rent for our new account. In this case, we will use our wallet to pay for that so let’s auto-fill our wallet’s public key for the first account.
As mentioned previously, each account in Solana is associated with a keypair. So in order to create a new account, we need to create a new keypair and then use the private key of that keypair to sign for this transaction.
Again, we can simply use the auto-fill to achieve this. The new public key of our keypair becomes the address for the new account we will create.
As expected both accounts need to sign for this transaction and they will be both written to.
Coming down to the instruction data, we can see that this operation takes 3 fields, besides the instruction indicator.
They are in order:
The amount of lamports we will deposit in the new account.
- Here I have chosen an amount that is larger than the rent-exempt amount required
The amount of space, in bytes, that this account will have
And finally, which account will be set as the owner of this account
Account ownership can be a confusing concept in Solana. The owner of an account is the only one that can modify that account, for example, change its balance or data content. Ownership is typically set to a program that will be responsible for actually updating the account.
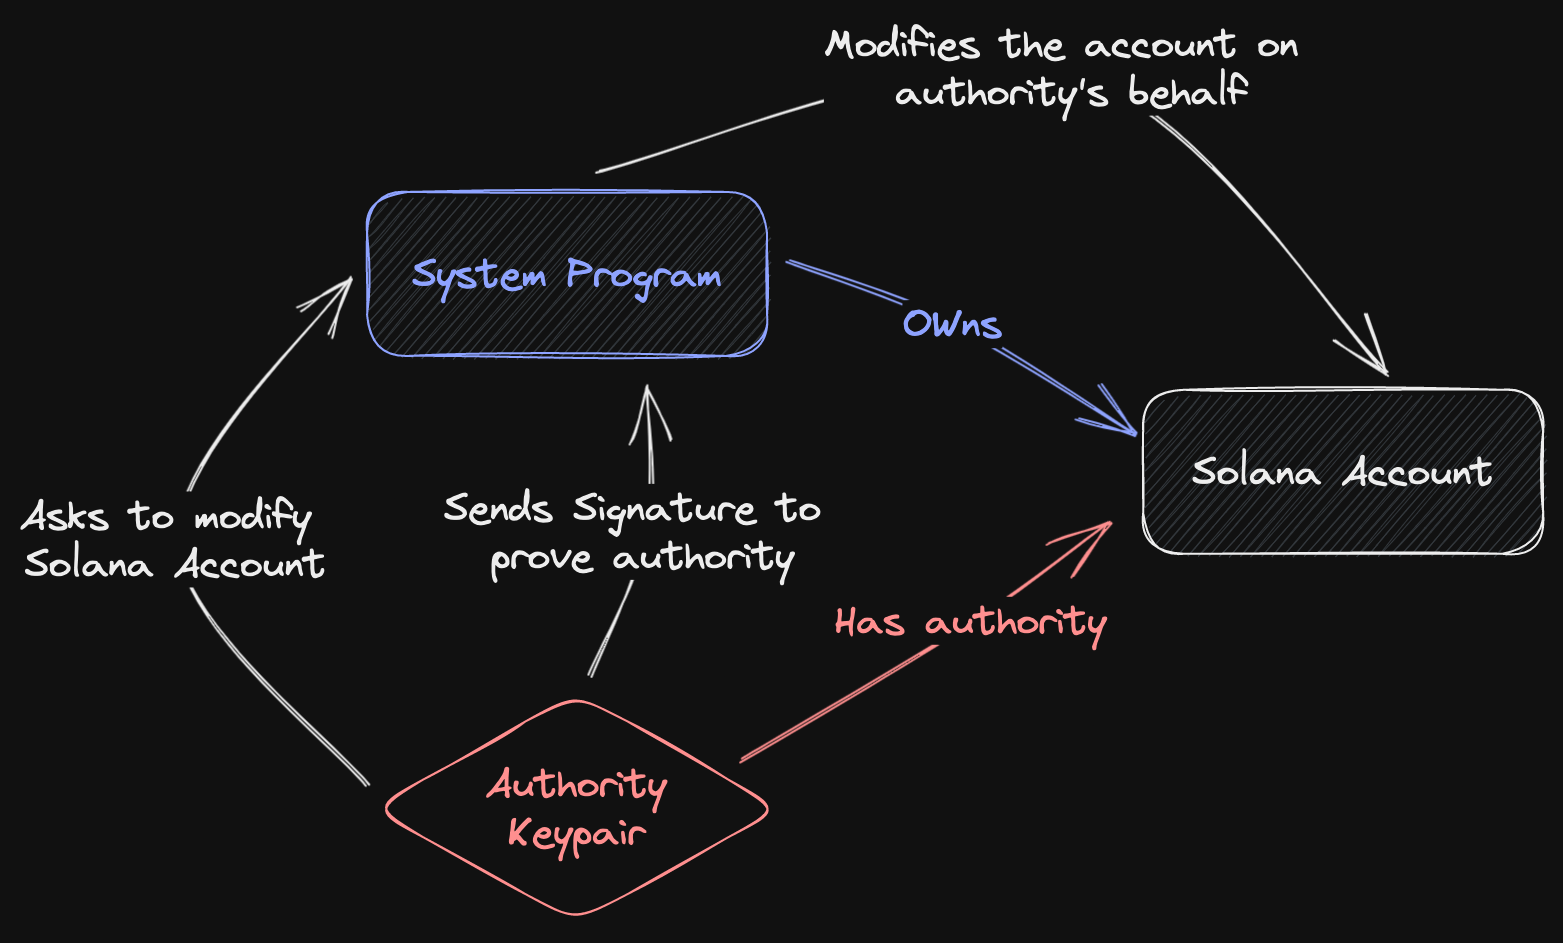
In this case, setting the owner to the system program makes sense, since we will be using the system program operations such as transfer SOL to interact with this account anyway.
This is different from the authority on the account. Previously, we generated a keypair for this account, which is how we prove we have authority over the account by signing future transactions with it.
The authority gives us the ability to request changes to be made to the account. But System Program is the one actually making changes. And before it does so, it makes sure that we have authority over the account.
Anyway, let’s send this transaction to Devnet.
Once the transaction is confirmed, we can look at the account that we just created.
As expected, it has the balance we paid for from our wallet and it has 64 bytes in size. The owner is also set to the System program.
You also note that this is not an executable account. This is called a data account and it is used to normally hold data, in this case, 64 bytes worth of data.
Solana programs are stateless so these data accounts are how the state is persisted across transactions.
Outro
Ok, I think we leave things here. I have shown you some basic ways of composing Solana transactions using Better Call Sol. Now it is your turn to go to bettercallsol.dev and try out some transactions of your own.
I hope you found this video useful. Please let me know on YouTube or Twitter if you want to see more content like this and I’ll see if I can be bothered.
Thank you for watching.